
目錄
什麼是Sendy
如果你有使用電子報行銷的話,會發現如果當訂閱數進入1000時,費用會開始變得很高。以我自己的Convertkit來說300-1000,一個月29美元,1000以上,一個月要49美元。如果你有穩定的現金流當然很不錯。但我自己目前的電子報還是以免費的、服務大眾為主,我想要更多人訂閱,但是訂戶增加,又會讓費用很快就破表。Mailchimp是用幾封來收費的1000封信,大約也要20美金左右,還是相當貴。有沒有什麼便宜的方案呢?
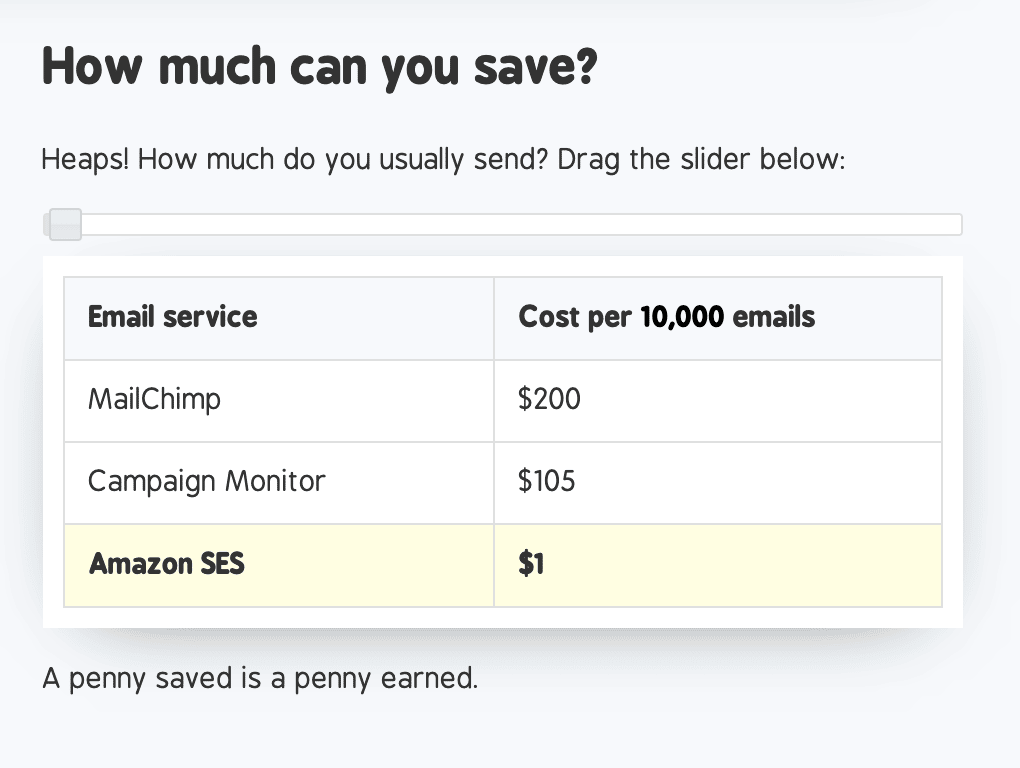
有喔,Sendy它其實是個可以架在自己網站上的電子報行銷工具。只有收取一次性的費用69美金。(當然每1-2年升級要再付費,可以免費升級一次),它背後是使用Amazon Simple Email Service(SES).Amazon的電子郵件服務 。我們假設一個月寄4-8次,人數都只有1000人好了,這樣一年下來的費用。Convertkit一年是290USD(1000人以下),490USD(1000-2000人次)
因此,我們假設Sendy一年升級一次(可能2年一次就好)
- 69(sendy的費用) + 5*12(架伺服器的費用) + 1.5*12(一個月一萬封信約1美金,還有一些流量費,我們算0.5高一點好了) = 147左右
也就是你一年可以省下1/4-1/2以上的費用了。
我的組合是使用Digital Ocean + Sendy + Amazon SES + WordPress當我的landing page。
Amazon SES申請開通
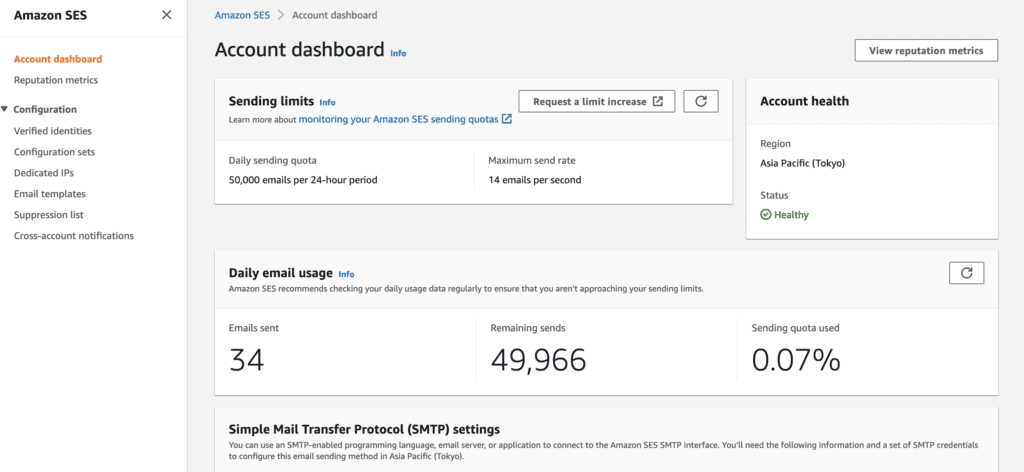
申請的初期是不用費用,一次一天可以寄200封(測試時),你需要手動寄信去申請50000/天的使用量,因為他怕你亂寄信。因此,你要寫清楚你申請的目的,我的範本如下:
Hello, Amazon SES Teams:
My website is anatomind.com
Right now, I am using Convertkit(你的email 產商) to communicate with my subscribers. It is around 1000 users.
I normally send 1-2 weekly emails to them, and for a small group of people, I will send them special content.
Because I want to build a forum (discourse) and automatically send weekly updates to them.
I want to switch to Amazon SES for further more subscribes.
I will use sendy.co app to manage the recipeints. (bounces, complaints and unsubscribe)
Once your teams grant my request, I will purchase the license.Thanks for your quickly reply!
Soanseng.
接著,你要在 configuration -> verified identities 裡面,加入你的域名(你的email要設定在哪裡)、還有你寄出的email。
域名是使用DNS(你可以在你的域名商裡設定),email的話,他會寄一封信給條。
第三,你要開通 Amazon SES SMTP 會在 I AM console 裡面,他會給你一組帳號密碼。(要記下來,只的出現一次,忘記就要重新再申請一個)
在Sendy的官方步驟第五步有。記得要看影片!跟著做,要開啟 AmazonSESFullAccess 、 AmazonSFSFullAccess 。
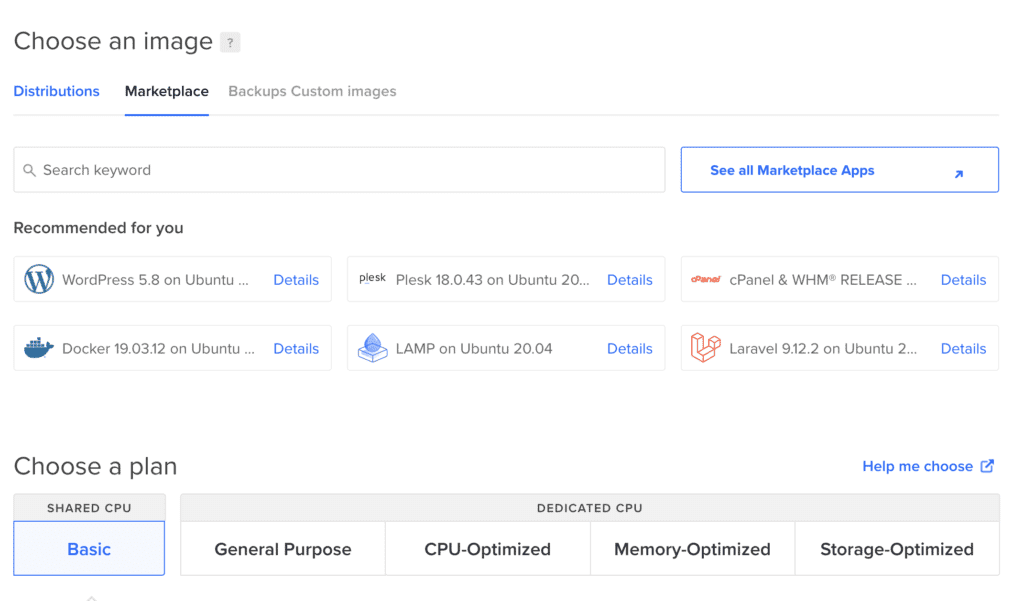
申請Digital Ocean
我本人的站都是架在Digital ocean,可以使用我的連結,你可以有100元的折抵。它一個droplet的應用程式只要5美元,一個月喔。伺服器選用新加坡就可以了。台灣連過去很快的。
在 create droplet 裡面選用 LAMP on Ubuntu 就可以了。
- 等它提示安裝好後,記得使用 ssh大法和你的伺服器溝通。digital ocean有官方的介紹
ssh root@你的droplet_ip
安裝sendy在伺服器上
你需要有php8,照著這個步驟做就可以了。
這裡有另一篇英文版的(看圖照做)
php -v

# if php 8 then
sudo add-apt-repository ppa:ondrej/php
sudo apt-get update
sudo apt-get install php8.0-curl
sudo apt-get install php-xml
sudo apt-get install php8.0-xml
systemctl restart apache2
sudo systemctl reload nginx
sudo service apache2 restart

# Set up A record for domain(記得去你的DNS域名商設定)
certbot --apache -d sub.domain.com
# certbot --nginx -d sub.domain.com -d www.sub.domain.com

mysql

# Run the following four linces copied/pasted at once.
create database sendy;
CREATE USER 'sendy_admin'@'localhost' IDENTIFIED BY 'PASS_HERE';
GRANT ALL ON *.* TO 'sendy_admin'@'localhost';
FLUSH PRIVILEGES;


# 把你買的sendy用 rsync的方式,上傳到digital ocean處
# - Setup sendy/includes/config.php file
# Copy sendy to server
# - `rsync -av Downloads/sendy/ root@DO_IP_HERE:/var/www/html/`

chmod 777 /var/www/html/uploads/

sudo a2enmod rewrite && sudo service apache2 restart

# Now access your domain to install.
這以上做完之後,你的sendy就會動了!
其他要注意的事情
- autoresponder(自動排程) 要讓人註冊後,可以發自動的信件,你需要設定自動排程。
需要在ssh下,編輯cron job,sendy都有寫好了。
你也需要設定好你的Amazon SES喔 Please review the following pointers:- Please ensure that you have moved out of Amazon SES ’Sandbox mode’ by requesting Amazon to raise your ‘SES daily sending limits’ → http://aws.amazon.com/ses/extendedaccessrequest. If your Amazon SES daily sending limit is 200 emails per day, you’re in ’Sandbox mode’.
- Please check that you have verified your ’From email’ or its domain in your Amazon SES console
- If you attempted to verify any emails or domains in your Amazon SES console and the status is ’failed’ or ’pending confirmation’, please either complete the verification or remove the ’failed’ email or domain
- If you attempted to verify the sending domain’s DKIM and it’s in ’pending’ or ’failed’ status, please either complete the verification or do not verify DKIM at allAutoresponder not working — Sendy Forum
- crontab 你需要設定這兩個,之後sendy就可以安排何時何月寄信,而且有新的使用者註冊時會自己寄信喔
 crontab -e
*/1 * * * * /usr/bin/php /var/www/html/autoresponders.php > /dev/null 2>&1
*/5 * * * * /usr/bin/php /var/www/html/scheduled.php > /dev/null 2>&1
註冊email的form或是landing page
因為電子報行銷工具是自己架的,沒有漂亮的form。
你也可以自己手刻html+javascript 然後自己串sendy的API。
比較快是用現成的啦。
我看過一些,比較漂亮的是Carrd。一年的費用是9-49USD。看你的功能。
便宜的就可以串sendy了。但僅有名字和email。
你需要更多客製的欄位就需要付到49USD(一年)
如果你需要像convertkit那麼多tags欄位的話。
我個人是使用wordpress插件Hustle。免費版的就有名字和email的欄位,我覺得很夠我用。
如果你使用場景比較復雜的,可能就需要付費了。
如何覺得麻煩…有托管服務
還有一種叫Sendybay的服務,你只要每個月付15USD,你都不用設定。他幫你設定好。你只要有sendy的license就可以直接使用了。不需要上述這麼麻煩。還有很多Template可以使用。有心動但又不想要這麼煩雜的話。Sendybay可以考慮。
有其他問題
- 可以到sendy的官網有安裝教學
- 有問題FAQ區 Troubleshooting & support
- 也有論壇找答案,會比在google上來得快